Wednesday, March 24, 2010

So Excited About My Irish Linen Gift..........

Well, of course there is a story to this gift..........

I have been helping out a friend who is clearing out her parents home.........   I have been through this process so understand her situation a lot.

So she has let me look around and see if there was anything that I needed before she had her sale........the better word should be "wanted".    I found a lot of old neat things which I will tell about in another post.   

I saw this stack of beautiful Linen fabric and asked her about it.   She proceeded to tell me the story about this being her mother's and it was handmade in Ireland and is over 100 years old.     She said that she was thinking of keeping it so I encouraged her to do so.   She sat it down and about 30 minutes later, she came back and untied it and counted out the pieces (which are a little over a yard each).    She counted out 18 pieces and handed them to me and said "thank you".   The thoughts were rapidly going through my head as to what I could make with it.........I was so happy.   This happened a couple of weeks ago.

Fast forward to this morning.   I get a call from her this morning and this is what she said......."I've decided not to keep the remaining 19 pieces of the linen fabric so I brought it down with me so I could give it to you."     Usually I am up and at it and ready to roll for the day by that time but not today...........that quickly changed as she said she was only going to be there for a little while and she didn't want to leave it sitting around in case someone thought it was a sack of rags.........   So I now have all 39 pieces........what a friend........what a gift.   Now I need to get busy and make something with it but I want to research and find out the best way to color and decorate a couple pieces of it.


So if that wasn't enough, I got a whole box of old doilies and linens.   I haven't a clue as to what I will do with them or use them for but I love them.   And what is really neat is that I had known my friend's wonderful mom who made them and embroidered these items.


Tuesday, March 23, 2010

That Was Easy

At my Goodwill stop today, Robin brought out another patch of goodies for everyone to the area where she lets everyone pick through it.........hoping that everyone will buy the stuff so she doesn't have to put it away.    She is one of the friendliest  Goodwill employees I have run into and we have become friends.

As I was grabbing for the graphic and art pencil sets as I spotted them while she was wheeling the cart out, she came up to me and punched this item and said, it really is that Easy.   I looked up and saw the Staples Easy Button and got to laughing and before we knew it, we had a crowd.    So of course I had to buy it.


It was funny but the other day when I saw the advertisement that I thought it would be a lot of fun to have that Easy Button.............well my wish was granted for a mere 80 cents today.......you just had to be there to see how funny it all went down.   The boss came out, whose name is Brian, and was teasing with Robin and said, "Don't you know, it is against the rules to have fun at work" and then smiled, laughed and left.  He is a great guy.    He looked at me and said, "oh no, you got the button".........   We are also on a first name basis.......funny story to that happening too.  
 
Sorry, I haven't posted in awhile..........haven't created anything in a long time.   Sometimes, life happens and there are more important things to focus on..........I can't imagine, in my world, what that would be but it does.   Have a great day and I hope to post soon.


Friday, March 12, 2010

The Beginnings of Some Altered Patchwork Wall Hangings

I can't believe that it has been a week since I posted.......WOW......Life has been busy.........Obviously I have not been doing anything creative but doing more important things like helping out some friends of mine who needed a helping hand.

I did these awhile back but just haven't posted them.   They are the beginning stages of some wall hangings, altered art or whatever I might use them for.

Some of the pieces are from cut up strips of canvas that I painted and decorated with stencils.   Some are a combination of grungepaper (designed by Tim Holtz and manufactured by Advantus) and decorated canvas pieces.    These were all sewn with a sewing machine.   I really love grunge paper to incorporate in a lot of my artwork as it is so easy to work with and very flexible and paints/inks up well too.   I just love the texture of it.   It works well for Altered Trading Cards  and great for embellishments of all kinds too.   I use this a lot in place of chipboard nowadays. 

This first piece is a combination of grungepaper and my decorated canvas.  The grungepaper is all inked up with either Distress Ink or Adirondack Color Wash Sprays.   And if you look closely, there are areas where I have started putting a second layer on here and there.   They are two inch squares.   This piece is 12 x 12.   I might cut this down to fit in a 9 1/2 inch frame I found as I think it would make a great framed piece of art. 


Here are some other pieces that I have sewn together and some are all canvas and some are canvas and grungepaper.   These two pictures show the front and back of one piece.   When I paint and decorate my canvas, I always do both sides.   For that matter, I usually do both sides for paper, canvas and grungepaper........that way I have more choices on designs when picking a certain piece for a project.   I just might cut these two pieces up in two inch squares or perhaps three inch squares.........who knows but it is just nice to have these things handy for whatever flips my switch that day or hour.


Two more pieces that are front and backs of the same piece.   It looks like I did some fancy stitching on this one.    On all the other ones I just did a zig zag stitch.  


If you look closely at this next one, I stamped word sayings on it and then did a zig zag stitch all over it in many directions.   I think this piece is all grungepaper.     I really don't like it a lot but I can just dry brush over it with acrylics or spray it with inks or whatever until I like it.


I don't have a clue what I am going to use this piece for but who doesn't need some red, white and blue available to use in your art.   This is canvas.


Believe it or not, the next two pieces are fronts and backs of each other. 


The piece below was done on grungepaper.   Don't have a clue what I will use it for but something will come up.........trust me on that one.........it always does.   It is so nice to just have the unfinised pieces around just wondering when they will be put to use.


Check back soon as I will be posting about a really neat shopping adventure I had last Sunday.......a friend is having an estate sale at the end of this month but she let me in early so I could pick out whatever I wanted..........oh be still my heart.   The whole house was full of stuff but a lot of it I just wasn't interested in (been there and done that unfortunately) but there were some really cool things that I found to use in my art and some things that I just might not use and just look at.   I need to take pictures, etc........stay tuned.  

Friday, March 5, 2010

Resistors = Bracelets

A few years ago, while in Oregon, I learned about a place called Willie's.........a store full of creative goodness.   Well I visited and bought a bunch of stuff including some resistors.    I put them away and then couldn't find them........came back to Arizona and they were still MIA until just a couple months ago when we caught up with each other again.  

I poured them out in one of the red wagons so you could get a view of them.   They come in all different shapes and colors.   A lot of them have wires at both ends and some of them have two wires at one end.   As to what they really do in the real world, I don't have a clue and really don't care.   All I know is that I could use them in my art world.


I quickly made up a few to use as charms for a bracelet.  You can either cut one end off and just have one loop or you could do a loop on each end.    I know the loops are not perfectly round but I really don't care......kind of like the odd shapes of them.


Then I thought I would quickly make up a bracelet or two.   On the first bracelet, I added some of my things to it like monopoly game pieces, a watch face, a hand, eye glasses, shoes, some bead danglies I made and the resistors.   I put the resistors on first and I just secured them directly to the bracelet doing a wire wrap right onto the link of the bracelet.   Then I added the other stuff with jump rings.


I then made a bracelet with just the resistors and all of them were added directly to the links of the bracelet.   I put one on each link.......no jump rings on this piece.


So that's what I did this morning which was a lot of fun.   And it was a quick little project.

Check out Sherry Goodloe's blog because she is having a weekend giveaway.   I loved the necklaces she did and posted about earlier.   Now she is giving away a bracelet of the same style for a Weekend Giveaway.   She is a wonderful mixed media artist.

Thursday, March 4, 2010

Popcorn......Memories.........Art

I am sure you are wondering what the title represents but the other day in my thrift shopping endeavors, I found a package of Popcorn sacks.   They brought back memories of how, as a child, we would sit around one of those big radios, that was like a piece of furniture, and eat freshly popped popcorn and listen to the old Radio programs. We would sit there riveted wondering what was going to happen next.     This is not the one we had but something like this as this is from 1939 but just something to give you an idea....   


The popcorn bags are going to be used as pages in my journals, especially the Remains of the Day Journals which I have posted about in earlier entries.   In these journals, the pages are very unique and different and the popcorn bags will just be perfect.

http://usingupallthatstuff.blogspot.com/2010/01/pages-for-remains-of-day-fabric-journal.html

http://usingupallthatstuff.blogspot.com/2010/01/fabric-journals.html

http://usingupallthatstuff.blogspot.com/2010/02/another-rod-journal.html


Wednesday, March 3, 2010

Hello Friend Giveaway

Wow, yet another giveaway.........and this one is huge.   Oh, Hello Friend is having a great giveaway with a lot of sponsors for Three Packages of goodness and two lucky winners will receive a set of Tapes.    Just click on the link and follow the rules.   It just might be you.

Tuesday, March 2, 2010

Some more fun wood items and numbers........

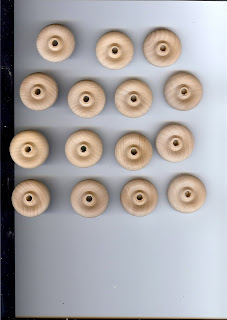
Here are a couple other items that was in the bag with the wheels........some wood thread spools and knobs.   On the picture of the knobs I put some upside down so you could see the top and bottoms.....

Please bear with me right now as I don't have my camera available and these are all scans.


I also found a large bag of numbers.......they are about 4" tall and will be a lot of fun to use in altered items, collages or just alter the numbers on their own.   I am showing ten here but there were 50 in the sack.   So much fun.


I need to stop posting about finding stuff and actually make some things and post the projects. There was a lady standing by me today while we were looking in the bins of stuff and she looked up at it me and said, "Isn't it all about the hunt". So true. It really is all about the Hunt.


Some Cool Wheels.........

Well, at least they are cool to me.   So many possibilities, so many projects, so little time.   Now I can have them doing wheelies all over my studio.   They are wood and about 1 3/8" across.

Just another cool find today at Goodwill..........     And it was Senior Day too.......20 percent off.    It's funny that I can remember the day when I thought being a Senior was being Old.   Now I think of it as opportunities.

An Inside Look of the 2010 Olympics

I am sure there are a ton of blogs that have posts about the Olympics but I met her through an online class that we are taking and she was a volunteer for the  Olympics.   She has a lot of inside pictures that not everyone would have.   Her blog is called Tattered Edge and she lives in Vancouver, BC and loves art like I do.  

Monday, March 1, 2010

Gingersnap Creations Birthday Party Giveaway

I just ran across this great blog, Gingersnap Creations Birthday Party Giveaway.   Take a moment to check it out and enter to win.

http://gingersnapcreations.blogspot.com/2010/03/birthday-blog-candy-bonanza.html

The beginnings of Decorating Papers.........

I have had many friends ask me how I decorate my papers.   For the papers I am going to show you here, I used some acrylic paints and a lot of Ranger's Adirondack Color Spray Washes and Ranger's Distress Reinkers with Perfect Pearls.  And you can use any dye ink reinkers to accomplish the same thing.   Just add the reinkers to the water until you are happy with the color.    Since I do so many at a time, I make up a quart size bottle of water, reinkers and perfect pearls.   One Warning:   This is a messy endeavor but a whole lot of fun.

A lot of times I will lay down some color with acrylic paints using stencils, masks, puchinella, etc and be sure and let it dry thoroughly before you put on the next layer of color.  I use the excess paint that is left on the stencil from the first piece to make another print on a new piece of paper.  I just turn the stencil over and rub my hand over the stencil or you can use a brayer.   I never let any paint go to waste.  It will be a lighter print of the stencil but makes for a good design.   You will see a lot of that done on these papers where there are many different colors.   I always let it dry between each color.  

Another way to make really great designs on your paper is lay down some light weight plastic and don't lay it out smooth.   Spray it with a few colors and then lay the paper down on it.  Pick it up and let it dry.   It gives it a great design that shows up on a lot of my finished papers that I have shown in previous posts.

I just try all kinds of stencils, Punchinella, doilies, lace.........you name it and just have a lot of fun doing it.

You can make your own stencils cutting whatever design you like.  I make geometric designs and sun rays and cut them out using an exacto knife.   Joann's/Michaels has sheets of stenciling material that works great.    I made some out of wallpaper and that worked well.   Any acrylic plastic sheets you have will work too.   Just look around, you will be surprised what will work.   Chipboard and anything paper will wear down after awhile.     In order to learn more about stencils and such, I took this great class with Mary Ann Moss called Stencilry.   She uses can spray paints but the smell gets to me so I use the color washes and reinkers to color with.

Another thing I like to use for the first layer is big image stamps like big leaves, big moon and stars, you name it, you can use it.   I do this with acrylic paints and let it dry thoroughly before you do the second layer of color.   And be sure and wash your stamps right away when using acrylic paints.

I use Wausau 140 lb Exact Index weight paper.    You find this kind of paper at places like Kelly Paper and PaperZone or whatever you have in your area.   I learned about this wonderful paper from Kelly Kilmer as it is such a cheaper route to go over watercolor paper.   It holds up well to paints, water and sprays.   Kelly does a lot of bookmaking and journaling classes  and she does online classes too which I have attended and loved.  


So this is the first, second, and third layers in my paper decorating endeavors.   Once I complete these, I will show you the finished product.

Here is a couple to start with.........


Here is a link to an older post of mine where I showed some of my other decorated papers.

http://usingupallthatstuff.blogspot.com/2010/01/decorated-papers.html

http://usingupallthatstuff.blogspot.com/2010/01/its-all-about-decorating-paper.html    

Please don't hesitate to either leave a comment or contact me via email, rubbermick at yahoo dot com if you have any questions about what I did above. 

The Beginnings of New Canvas Pieces

When I decorate my canvas that I use to make purses, wallets or journal covers,    I do it in layers using stencils I have purchased or made my own.   I also use Masks, Punchinella, Doilies, Lace Pieces..........or anything that will make a design on the canvas.    For all of these pictures I used acrylic paints to make the base designs.      I am not in my studio right now so will post pictures of the actual stencils I use in my next post.   I just start grabbing stencils and paint and just do it.........    I like to mix colors sometimes or just use one base color.    The canvas I used here was some I bought from a store called SAS (like a discount mills end store with fabric, lace, trims, zippers, etc.)  as it is so much cheaper there than at an art store.

In the photo where there are two different pieces shown, they are done with a monoprint of the original piece I did.  


In the piece below, I used a stencil that I purchased that was about eight inches square full of circles.  


In the three pieces below I used strips of Punchinella and in the subsequent two photos, I did monoprints of the first piece.


If you have any questions on supplies or techniques, don't hesitate to leave a comment or email me at rubbermick at yahoo dot com.